
Let The Custom Closet help you get organized! Call 800-304 4848
www.thecustomcloset.net
Today's tip is simply what the above statement says, "Just because you own it, doesn't mean you have to keep it." Quite often my clients will show me an item and say, "I don't know what this is, or how I got it, or why I have it... but I HAVE it, so where should I keep it?" and I say back to them, "Well....just because you HAVE it, doesn't mean you have to KEEP it." We then discuss whether or not the item is useful to them, or if they love it, or if it's simply just taking up space. Quite often they don't realize that just because they own it, doesn't mean they have to keep it. With a change in perspective, they can give themselves the authority and power to get rid of the things in their lives that they don't want, need, or love. Sometimes it's as simple as that. Just giving yourself the authority to say, "I don't want this." Then, go ahead and purge it (donate, throw out, recycle, or give it away.)
So look around your home and office, and find the things that have no true value to you that are simply taking up space, and give yourselves the authority to get rid of them. You'll be left more open space for the really useful things you truly want and value in your life. Enjoy!
Until next time, wishing you an easier life by Organizing With EASE.
Wednesday, July 7, 2010
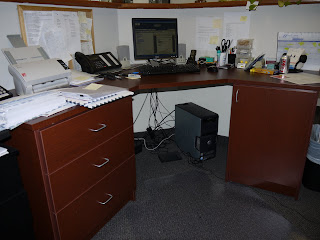
Monday, June 21, 2010
Custom Home Office with lateral files


Recent home office installation helps home owner organize family papers.
For more information and photos visit http://www.thecustomcloset.net/
(201) 666-1717
1-800-304-4848
Friday, June 4, 2010
Take 2 Minutes to Organize
Get Organized with www.thecustomcloset.net
Call 800-304-4848
Today's tip is quite simple, but it's effects in your life can be quite extraordinary. It's called the '2-Minutes or Less Rule'. Basically, it means if you can accomplish something that needs to be done in less than 2 minutes, then JUST DO IT! Don't put it off. Think about how much clutter could be avoided if you did the small things that take just a couple of seconds or at most 2 minutes. I'm talking about things like:
Putting a piece of clothing back on it's hanger, in it's drawer, or in a hamper instead of on a chair or the floor.
Putting a dish in the dishwasher instead of leaving it on the counter.
Putting a piece of paper in a meaningful file folder instead of in a pile.
Making a quick phone call to RSVP for a party, then putting the invitation in your 'invitations/appointments' file.
Having your kids unload their backpack folder and hand you the items that need your review.
Putting your shoes in a basket, shoe rack, or away in a closet instead of leaving them all around the house.
Putting a toy away.
Writing down a To-Do instead of hoping you'll just remember it.
The list of 2-Minutes or Less items is endless, so you can see how clutter can quickly accumulate if all these little items don't get done. Alternatively, you can see how clutter can be PREVENTED if you and your family simply stick to doing the 2-Minute or Less Rule, and JUST DO IT (and then it's DONE!)
Linda English
Organizing With EASE, LLC
201-638-9593 www.orgwithease.com
Tuesday, May 18, 2010
How to Manage Deep Shelves
More Organizing Advice from www.thecustomcloset.net
Organizing Tip: Solutions for DEEP SHELVING
Some of my clients have very deep shelving (deep front to back) in their closets, cabinets or open shelves in their garages and other storage areas. It's great to have all that room, but sometimes it can do more harm than good if not organized properly. Deep shelving can cause things to get lost in the back, and make it really cumbersome to access things stored in the back. This can make all that extra space become ineffective, and even wasteful. So, what to do? Here are some options:
1) INSTALL PULL-OUT SHELVES: This is an optimal solution for kitchen/bathroom cabinets, and even some closets because the shelves can then be pulled-out and you will have easy access to everything. But, this may not be a workable solution for wire shelving or garage/attic shelving.
2) LAZY SUSANS: For shelves at or below eye level, put inexpensive 'lazy-susans" in the back section of the shelves. Not a maximum use of space, but whatever is put there can be easily accessed by spinning what's needed into reachable distance...
3) STADIUM SEATING: Think of the concept of the tiered spice racks for the back-end of the shelf, or a make-shift version of this using old shoeboxes or even sturdy cardboard mailing boxes to raise up what's in the back half of the shelf so it's view-able. Keep what you store in the front of the shelf low, so you can see what's on the higher level in the back. (you can wrap the boxes in nice paper to make it look more pleasing. Can combine this w/ the lazy susan idea as well.
4) DEEP BASKETS OR TRAYS: Long baskets or trays that you can pull out to see what's in back. I've also heard someone using window box liners. Not the best looking, but can be very func tional and act as a long slide-able tray.
5) USE THE DOOR: If it's a closet or cabinet, then another great solution I I found is installing baskets, racks, bins, on the inside of the door itself. These can be a larger/deeper size if you install them in the right location on the door so that when the door closes, these bins fit in the space between the shelves. You can then mark a line on the shelf w/ paint, marker, shelf-paper... to block out the area that get's taken up by the baskets, so you know not to put stuff there. Then, your shelf is not so deep anymore b/c you're only storing stuff behind the marked line, and everything, both on the door and on the shelves, is more easily accessible. I've also heard of cutting a U-shaped area out of the front of each shelf to accommodate baskets on the back of the doors and allowing you to reach the back of the shelves.
6) IDENTICAL FRONT TO BACK : Process-wise, you want to store identical things on deep shelves in rows going front to back (no surprises on what's behind the front item - all the same going to the back and nothing unknown get's lost behind the front.)
7) LABEL: Even if you do have to store items in the back that don't relate to what's in front, then simply label the front of the shelves so it's clear what's stored in the back.
So, you can see, with a little creativity, you can transform those deep shelves into much more functional storage spaces!
Linda English
Organizing With EASE, LLC
201-638-9593 | www.orgwithease.com
Wednesday, April 21, 2010
Organize with Zipper Bags!
Call The Custom Closet for all your Shelving needs: www.thecustomcloset.net
(201) 666-1717
How great are zipper storage bags? (such as Ziploc brand). OK, I'll answer - they're awesome: a cheap, effective, durable organizing product. Here are some tips for how to use zipper storage bags around your home and your life:
Playroom
Use a zipper bag to contain all the loose pieces of board games, like Monopoly, Candyland, etc..
Bathroom
Keep toiletries intended for travel stocked in labeled zipper bags. When you're going on a trip, just grab the bags and go!
Kitchen:
Hang a zipper bag on the inside of a cabinet door or on the fridge for keeping coupons. When it's time to shop, just grab the bag and go!
Closets:
Store off season clothing in large size zipper bag totes.
Home Office:
Put owner's manuals and warrantee receipts in zipper bags labeled by room or other meaningful category. Store the bags in alphabetical order in a file box, basket, or drawer.
Travel:
Put shoes inside large zipper bags to keep clothing clean in the suitcase.
Boating:
Put your boating license, boat insurance and registration papers in a sealed zipper bag filled with some air. If the bag accidentally falls overboard, it will float!
Garage/Workshop:
If you have to take a short break during a painting project, place the brush into a zipper bag, squeeze the air out and seal. When you resume your painting, the brush will still be wet and ready to go!
Purse/Briefcase:
Keep a zipper bag in your purse or briefcase to corral all your receipts.
Do YOU have any great ideas on how to use a zipper storage bag? Send me an email and share!
--------------------------------------------------------------------------------
Until next time, wishing you and easier life by getting organized!
Linda English
Organizing With EASE, LLC
201-638-9593 | www.orgwithease.com
Thursday, April 15, 2010
Office shelving and organizing
Just in time for tax season, The Custom Closet outfitted Weber and Shapiro, tax accountants in Ramsey, NJ, with new shelving and cabinets for their expanded office.
Go to www.thecustomcloset.net for more information.


Go to www.thecustomcloset.net for more information.


Tuesday, April 6, 2010
Tips to Get Organized with Index Cards
Contact www.thecustomcloset.net to help you get organized today!!
(201) 666-1717
1. Make a to-do list. Probably the most obvious, but what’s great about using index cards for this is that it forces you to be concise. I write my top 3 Most Important Things to accomplish today on my Today list.
2. Take notes. I’m in a meeting with someone, and need a handy medium to take notes … so I whip out a blank card and keep bullet-point notes. Later, I’ll transcribe any necessary actions to my action lists and file the card.
3. Create a PDA. By now the Hipster PDA is pretty famous among productivity circles. It’s a way to keep all the info you need with you anywhere you go, using only index cards and either a binder clip or a rubber band to hold it together. Very handy.
4. Make context lists. In the world of Getting Things Done, context lists are central to organizing tasks. You can create a card for each context — computer, home, errands, etc. And the cool thing: unlike other organizing systems for context lists, with index cards you can place the context card where you need it. In other words, the @Home card is at your home, the @Computer card is next to your computer, the @Errands card can be taken with you.
5. Keep track of projects. There are a million ways of keeping track of all your projects. But few as simple as writing a list of them on an index card. And if you need to expand, you can create a card for each project that needs an outline.
6. Create a crazily obsessed organization system. Personally, I love this one: POIC (Pile of Index Cards). Created by a Japanese guy obsessed with organization, he took GTD to the next level. It’s a bit much for me, but the fetish-ness that he brings to the index card is just wonderful.
7. Create a novel. One card at a time. Nabokov, most famously, wrote entire novels on index cards, composing the novels in bits and ordering them into a book. But other writers have used similar methods using index cards.
8. Leave a note for someone. I like to write notes on a card when I’m forwarding a document or delegating an assignment, clarifying the actions that need to be done to the recipient.
9. Create a quick reminder. Need to remember to do something in the morning? Write it down on a card and place it somewhere you’ll never forget. I like to write down a reminder while I’m on the go, one per card, and then toss it in my Moleskine. When I get to the office or home, I just transcribe the reminders to the appropriate list (or do them immediately).
10. Make your life’s short list. Want to figure out how to simplify your life? Make a card with the 4-5 most important things in your life — your short list. Then focus your life on those things, eliminating all else. By putting this short list on a small card, you can post it somewhere visible and keep those priorities in mind, always.
11. Trick out your Hipster PDA. The regular version not enough? Add a Levinger Pocket Briefcase and some cool printed templates.
12. Organize your research. Regular notes not good enough? Use this system to keep things organized, geeky and useful.
13. Flick them at people in meetings. Ninja-star style. This might not go over too well in some corporate cultures. Be prepared for retaliation.
14. Develop consensus. The Card Carousel technique is actually an interesting way for a group to share ideas and come to a decision.
15. Organize your bills. Create a card for each bill, writing the name of the bill at the top. When you pay the bill, create an entry on the card. This way, you have a running log of all the bills you pay.
16. Doodle. Bored at a meeting? Use a blank card to doodle. Or if you’re more artistic than I am (and it would be hard not to be), you can use it as a mini-sketch pad. Just don’t let your boss see the sketch you did of him in his underpants.
17. Keep recipes. An old-fashioned use for index cards, to be sure, but one that works well. A card is perfect for a recipe, and if you keep them in a handy box, you’ve got them all organized alphabetically, for quick access when your kids are crying from hunger and you can’t remember the Stroganoff recipe.
18. Make a paper airplane. Not as light and far-flying as a model made from lighter paper, but cute nonetheless. Again, another great diversion for those weekly staff meetings. Bonus points: write love notes on them.
19. Flash cards. My kids use these to study for tests. They work well.
20. Origami. OK, I admit that I don’t know how to do this. But how cool would that be?
21. Shopping lists. Keep one posted on the fridge, jot down things as you run out of them, and take it with you on your shopping trip.
22. Book lists. I like to keep two book lists: one is a running list of books I’ve read, and another a list of books I want to read. When I hear of a good book, I add it to the list.
23. Handy log. Want to keep track of your spending, or eating, or anything else? Keep it on an index card, which you can carry wherever you go.
24. Organize your entire home. GTD not overboard-organized enough for you? Try the SHE system (Sidetracked Home Executives). They use index cards to organize everything: tasks that need to be completed on a daily, weekly, monthly, and seasonal basis, cleaning, decluttering, correspondences and more.
Linda English
Organizing With EASE, LLC
201-638-9593 www.orgwithease.com orgwithease@aol.com
Subscribe to:
Posts (Atom)